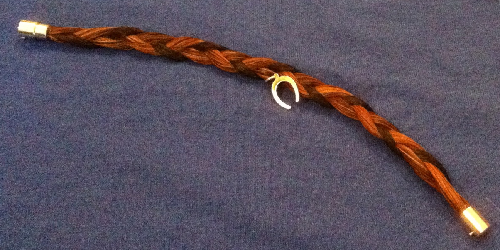
A horsehair bracelet is a great keepsake for any horse-lover, especially when made from your own horse’s tail hairs. Learn how to make one yourself.
Supplies needed:
The barrel connectors I used are for making Kumihimo bracelets and are easy to find at a bead shop. I got mine from Amazon. |
|
To Make the Braid
Collect the Hair
I chose hair from three different horses out of our herd. Cut the hair from close to the base of the tail. Making the cut from the underside of the tail will prevent the cut from showing. You only need a hank of hair about the diameter of a pencil from each horse. If cutting the hair from one horse, still make three different cuts to hide the damage. After cutting, tape the hank of hair at the cut end to keep the ends together and neat.
Straightening and Sizing the Bundle
Once back at your work station (dining room table, whatever), carefully smooth out the tangles so the hank is completely straight and tangle free. There will be some shorter hairs in the bundle: the goal here is to have strands that are all at least 3″-4″ longer than your final project length. If you are making a bracelet, then 14″ or so is the goal. If making a necklace, you’ll need to aim for 22-26″ (which might mean you’ll need to collect more hair in the first place since many strands won’t be long enough). For these instructions, I’m going to assume we’re making a bracelet.
Find a point about 14″ from the taped end and tape this here. You can cut below this tape point a couple of inches to get the longest strands trimmed up. Now remove the first tape and shake out any short strands that are not held by the second piece of tape. These strands are too short, and would end up being only secured at one end on the finished bracelet and would make the bracelet look a little ragged if they were included.
At this point we should be left with a hank of hair where all the strands are at least 3″-4″ longer than the finished bracelet. You’ll now need to size the diameter to fit the barrel connectors. I am using 6mm connectors and I want a little space to make fitting the hairs into the end of the barrels, so I used about a 3mm diameter for each hank of hair for the braiding. In theory, I’d be able to put four 3mm hanks into the 6mm connector, but that extra space is to a) keep me sane during assembly, and b) allow some space for glue.
Prepping for Braiding
The next step is to bind the strands back together smoothly. To help this, we are going to introduce a little twist into the bundle. While optional, this step helps smooth the hairs for a sleeker finished product and is worth the effort.
Secure the taped end to the tabletop with more tape, and have the hairs hanging off the edge of the table. Now gently roll the loose strands between your fingers, introducing a little twist into each individual strand. The strands will then all want to spiral and twist around each other, making the individual strands into a larger cable. You don’t need to overdo this, just introducing a little twist will help all the strands to lay flat next to each other.
Continue this rolling and twisting, moving your hand down the loose strands, until you get close to the original cut ends, then retape this lower end. When you release the hair cable, it will untwist some – this is fine. The goal here is to have a smooth, perhaps slightly twisting, bundle of hair with each of the strands laying smoothly next to its neighbor. Repeat this process until you have three equally-sized smooth bundles at least 3″-4″ longer than the length you need for the finished product.
Braid Them Together
Tape all three bundles tightly together at the table edge. Using a left-over-right, right-over-left motion, braid the three bundles together. Take your time to:
- Keep the braid tight and consistent as you move along.
- Reign in any stray hairs that pop out of a cable. You may need to un-tape, re-twist, re-smooth, and re-tape the loose ends to remove any pop-out strands. On the bracelet above, I had to restart three times to get a smooth finish.
- Avoid any bend or twist in the overall braid.
When you get to the end, bind all three strands tightly together with tape. You can actually tape together about 1″ in from the end, and tape on top of the braid. This will help the braid continue close to the barrel when complete.
Once taped off, use a pair of sharp scissors to trim the braid about 1″ below the taped off end. This gap will allow you to glue the hairs into the barrel without getting glue on the tape itself. One trick to making the assembly easier is to cut not-quite-straight across the bundle. A very slight slant, such that the long end is perhaps only 0.5mm (1/16″ of an inch or so) shorter than the other will make inserting the strands of hair into the barrel easier in the next step.
The Glue-up
This is the messyist, most “fiddly” part of the construction. The goal here is to have the end of every strand of hair covered with glue and every end of every strand in the end of the barrel connector without getting glue over the other parts of the braid, yourself, or your workspace. Not an easy task, but here are a couple of hints to help.
- Cover the rest of the braid with a piece of clingwrap plastic, tape, or a plastic bag to protect it from gluey fingers.
- Consider using rubber gloves for easier cleanup.
- Mix up the glue on the plastic lid, using the narrow end of your stirrer
- Mix well.
- More than that.
- Ok, now scoop up a small amount of glue and coat the inside of the barrel. You are just looking to get glue on the inside sides – not to FILL the barrel connector.
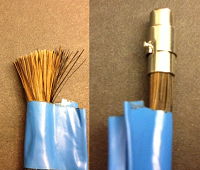
- Scoop up a little more glue and repeatedly stab the applicator into the end of the combined cable of hair. The goal here is to get each hair end coated with glue. Add more glue as needed but don’t go overboard with glue.
- Carefully insert the glued-up ends of hair into the barrel connector. Get EVERY hair in (this is difficult). Twisting the cable of hair while inserting will help. You still may have to make multiple attempts.
- Once in, stand the strand on end with the barrel down. Hold the cable of hair perpendicular to the connector until the glue sets (should only take a couple of minutes – you ARE using 5 Minute Epoxy, right?). Monitor the glue setting by looking at the unused glue on the lid. Note that the barrel may take perhaps a minute longer due to the smaller amount of glue there.
Once the glue as set up, remove the tape from that end. Pull the tape TOWARDS the cut end of the hairs so that you don’t inadvertantly pull the hair out of the connector. Work slowly to minimize disruption.
If you got any epoxy where it shouldn’t be (fingers, outside of barrel, etc.) you can do a little cleanup using the vinegar and the rag. Vinegar will dissolve the epoxy, but only BEFORE it has completely cured. Vinegar will also interfere with the glue setting INSIDE the barrel, however, so use quickly and sparingly to remove the epoxy from the outside of the barrel without getting vinegar on the hair or in the end of the barrel.
Set the braid aside to allow the glue more time to set. If making a second bracelet, this would be an excellent time to start it.
Finishing the Other End
Once the glue is well set (20 minutes?) you can work on the second end. Attaching the second barrel end works the same as the first, with a couple of special considerations.
- You will need to cut the remaining end to length. Place tape about 1″ short of the cut length. Tape tightly, then trim to length.
- Gluing the second barrel connector works just like the first one.
- You will need to check the alignment of the barrel pins once the second end is in place. There’s a trick here: if you make the barrel alignment such that the pin ALMOST lines up, but is a little bit to the “closed” side, then the bracelet will naturally try to twist to keep itself closed. Put it too far to the “open” side, and the barrel lock will be constantly opening itself.
- This is easier to accomplish than it sounds: once the hair is all inside the second barrel connector, but before the glue sets, bend the bracelet around to the closed position, but don’t actually connect the barrel ends. Look at how the barrel pin aligns with the slot on the other connector. If needed, spin the barrel around the hair bundle so that the pin lies a little past where the closed position would normally place it.
- Now hold the barrel straight down and the hair bundle straight up until the glue sets.
- Clean with vinegar again.
Final Cleanup
Once you THINK you are done, do a final look-over on the bracelet. You may find a little blob of epoxy you missed. You can try more vinegar, or simply pop the epoxy loose with a fingernail or knife. If there are any wayward strands of hair, you can cut them off at the barrel (carefully, to avoid cutting any other strands), or can cut them off where they travel back into the braid. Nail clippers work well for this. If a loop of hair is standing out of a braid, cutting it in half and treating it like two loose strands ends up looking better than leaving the loop popping out.
After the glue has set up for 24 hours or so, you can also work the braid around a bit and this will help even everything out.
Adding the Charm
If the charm’s split ring is large enough, you can have it float along the bracelet. If not (mine wasn’t), simply run the split ring through one of the braid strands and close.
One Final Tip
Several steps require taping and retaping the hairs. To make this easy, cut about a 3″-4″ piece of electrical tape. Fold over 1/2″ on each end, making a little tab. When you go to tape up a bundle of hair, twist it slightly to force the bundle together, fold the tape almost in half, and force the bundle into the bend. Once snugly in the bend, complete the fold to stick the tape to itself. To release, just pull on the two tabs and the tape should unstick from itself. Gently remove the tape from the hair.
Looking for other ideas for the special horse crazy person in your life? Here are some ideas: